React Native 프로젝트에서 Fastlane을 사용하기 (IOS편)
아래 내용은 Getting Started · React Native 에 따라서 기본 환경을 구성했다는 전제 하에 진행됩니다.
React Native Project 만들기
우선 샘플 프로젝트를 하나 만들도록 한다. 주의할 점은 create-react-native-app로 만들지 말아야 한다는 것이다. crna로 프로젝트를 만들면 expo로 동작하는 데 이용하면, 네이티브 프로젝트를 만들고 Native Code를 Testing 하는 것이 불가능하다.
아래 명령어로, project를 init한다.
$ react-native init DevOpsForRN # Native Project Initialize
$ cd DevOpsForRN
Fastlane을 Native Project Directory 에서 사용하기
* 아래 서술하는 내용은 공식 문서와 동일하다.
* 우선 fastlane을 사용하기 위해서는 글로벌로 설치를 해야 한다.
# Using RubyGems
$ sudo gem install fastlane -NV
$ sudo gem install bundler

# 위 명령어가 실행 불가능 하다면 대안으로 아래 명령어를 실행한다.

# Alternatively using Homebrew
$ brew cask install fastlane
$ sudo gem install bundler
* 첫 번째로 ios 폴더에 들어가서 초기화를 진행한다.
$ cd ios # DevOpsForRN/ios
$ fastlane init # 초기화
* 다음과 같이 어느 걸 하고 싶으냐고 나올 텐데 우리는 여러 가지 일들을 manual하고 싶으니 4번을 선택한다.
[13:48:34]: What would you like to use fastlane for? 1. 📸 Automate screenshots 2. 👩✈️ Automate beta distribution to TestFlight 3. 🚀 Automate App Store distribution 4. 🛠 Manual setup - manually setup your project to automate $ 4
명령어를 치고나면
* DevOpsForRN/ios/fastlane/Appfile -> 프로젝트나 account config(app_identifier, apple_id)
* DevOpsForRN/ios/fastlane/Fastfile -> 실제 돌릴 명령어들을 정의
* DevOpsForRN /ios/fastlane/Readme -> 설명서, lane을 추가할때 자동으로 변경됨
* DevOpsForRN /ios/fastlane/report.xml -> fastlane 명령어를 돌릴때마다 변경되는 report 문서
실제로는 Appfile 은 정해진 계정, bundle identifier등을 맨 처음 한번만 정의하면 되고 Fastfile의 경우는 **lane(작업들의 집합)**을 정의할 때만 수정하면 된다.
다음 빌드로 넘어가기 전에, 한 가지를 짚고 가야 한다. IOS 에서는 Code Signing이라는 개념이 굉장히 중요하다. Code Signing을 하지 않으면 Beta testing service에 올리거나, App Store에 Deploy 할 수 없다.
Fastlane에는 3가지 signing 방법이 있다.
Fastlane의 3가지 Signing
Match -> private key와 certificates를 git에 암호화하여 보관하고, 이를 가지고 signing하는 방법
Cert and Sigh -> private key와 certificates를 local에서 가지고 있고, 이를 signing하는 방법
Manual -> Apple Developer Portal에서 .p12, .cer, . mobileprovision을 직접 signing 하는 방법
1번 방법(Match)**이 암호화된 인증서를 git에 올리는 게 다소 이상할 수 있지만 이 방식은 생각보다 안전하고, 새로운 팀 멤버가 들어올 경우 아니면 새로운 개발 장비를 세팅 할때도 쉽고 간편하므로 1번 방법으로 선택했다.
Code Signing에 대하여 더 자세히 이해하고 싶다면 Code Signing Guide for Teams 문서를 참조하자.
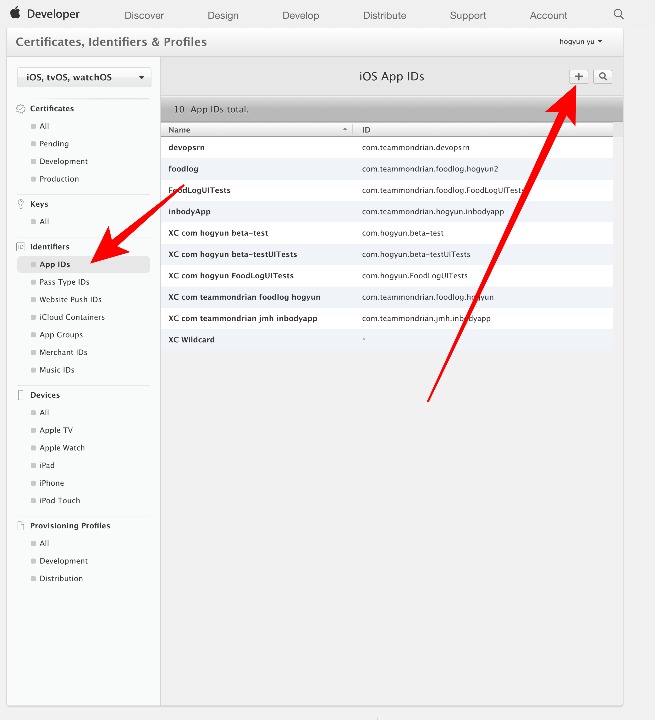
Apple Developer Portal에서 Bundle Identifier 생성
Apple Developer Portal 에서 bundle identifier를 만든다
* 좌측 탭에서 Identifiers -> App IDs
* 우측 상단에 + 버튼 클릭
* 앱 이름을 입력
* com.teammondrian.devopsrn 와 같은 당신이 만들 identifier 입력
* Done을 클릭

Fastlane 설정 파일 수정
다음은 match - fastlane docs 을 따라 하는 내용과 동일하다
* 첫번째로 private key와 certificate를 담을 Github Repository를 새로 하나 생성한다.
* 주의할 점이 하나 있는데 민감한 정보를 담기 때문에 Private Repository 로 만들어야 한다.
# DevOpsForRN/ios 폴더에서 진행한다.
$ fastlane match init
# 명령어를 입력하고, 방금전 만든 github-repo주소를 넣는다.
$ fastlane match appstore
# 애플 아이디와 비밀번호를 묻는다.
# 이전에 만든 `com.teammondrian.devopsrn` 와 같은 identifier를 입력한다
# passphrase -> 파일들을 암호화할 비밀번호를 입력한다. (자기가 만들 비밀번호)
* 그러면 DevOpsForRN/ios/fastlane/Matchfile이 만들어 지는데, 다음과 동일하도록 수정한다.
* type 'development' 를 type 'appstore' 로 수정한다.
* app_identifier ['com.teammondrian.devopsrn']에서 com.teammondrian.devopsrn 를 당신의 Bundle Identifier로 변경한 후 추가한다.
* username '[email protected]' 와 같이 이메일을 당신의 Apple ID로 변경후 추가한다.
git_url 'https://github.com/philographer/create-react-bootstrap-match.git' # 당신이 생성한 git repo의 주소를 입력

type 'appstore' # 기본값은 development이지만, appstore로 수정한다. appstore, adhoc, enterprise or development가 될 수 있다.

app_identifier ['com.teammondrian.devopsrn'] # 당신이 생성한 bundle identifier 입력
username '[email protected]' # 당신의 apple id로 수정

# For all available options run `fastlane match --help`
# Remove the # in the beginning of the line to enable the other options
* DevOpsForRN/ios/fastlane/Fastfile 도 파일이 다음과 동일하도록 수정한다.
* 아래 부분에서, 'com.teammondrian.devopsrn” 로 되어 있는 부분을 당신의 Bundle Identifier로 변경한다.
# This file contains the fastlane.tools configuration
# You can find the documentation at https://docs.fastlane.tools
#
# For a list of all available actions, check out
#
#     https://docs.fastlane.tools/actions
#

# Uncomment the line if you want fastlane to automatically update itself
# update_fastlane

default_platform(:ios)

platform :ios do
  desc 'Build and run tests'
  lane :test do
    scan(scheme: 'DevOpsForRN')
  end

  lane :beta do
    desc 'TesfFlight for IOS'
    # Circle CI does not create new code signing certificates or provisioning profiles.
    sync_code_signing(type: 'appstore', readonly: true, app_identifier: 'com.teammondrian.devopsrn') # Bundle Identifier를 아까 만든 값으로 치환한다.
    # see code signing guide for more information, readonly because of CircleCI
    build_app(scheme: 'DevOpsForRN')
    upload_to_testflight(skip_waiting_for_build_processing: true)
    # slack(
    #   slack_url: 'https://hooks.slack.com/services/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'
    #   channel: 'dev',
    #   message: 'Successfully uploaded a fastlane beta release'
    # )
  end
end

lane :increase_build_number_and_push_to_beta do |values|
    # Increment the build number (not the version number)
    # Providing the xcodeproj is optional
    increment_build_number(xcodeproj: 'DevOpsForRN.xcodeproj')
    # Commit the version bump
    commit_version_bump(xcodeproj: 'DevOpsForRN.xcodeproj', force: true)
    # Add a git tag for this build. This will automatically
    # use an appropriate git tag name
    add_git_tag
    # Push the new commit and tag back to your git remote
    push_to_git_remote(
        remote_branch: 'beta', # optional, default is set to local_branch
        force: true,    # optional, default: false
    )
end
* DevOpsForRN/ios/fastlane/Appfile 도 파일이 다음과 동일하도록 수정한다.
* app_identifier 'com.teammondrian.com' 에서 com.teammondrian.com 부분을 당신의 Bundle Identifier 로 변경 후 추가한다.
* apple_id '[email protected]' 와 같이 이메일을 당신의 Apple ID로 변경후 추가한다.
app_identifier 'com.teammondrian.com' # The bundle identifier of your app
apple_id '[email protected]' # Your Apple email address

# For more information about the Appfile, see:
#     https://docs.fastlane.tools/advanced/#appfile
* IOS의 경우, TestFlight에 올리려면 Image Assets 들을 올려야 한다. 테스트 용도이므로, Free vector icons 에서 자기가 원하는 이미지를 선택하고

Use Asset Catalog를 클릭하고 필요한 Aseets들을 집어넣는다.
작성자는 Asset Catalog Creator Pro 를 사용하였지만, 인터넷에서 다른 Asset Generator를 사용해도 무관하다.
Itunse-Connect 앱 등록
* iTunes Connect에 로그인
* 나의 앱 -> + 버튼 -> 신규 앱
* 플랫폼 -> ios 체크
* 나머지 내용들을 채우고, 번들 ID 는 이전에 Developer Portal에서 만든 Bundle Identifier를 선택한다.

Fastlane on the CircleCI
이제 대망의 CircleCI와 Fastlane을 연동할 차례이다. 이를 위해서는 Continuous Integration - fastlane docs 문서를 따라해보자.
* DevOpsForRN/ios/fastlane/Fastfile 경로에 다음과 같이 추가하자.
# DevOpsForRN/ios/fastlane/Fastfile

...
platform :ios do
  before_all do
    setup_circle_ci
  end

 desc 'Build and run tests'
...
end
* DevOpsForRN/ios/fastlane/Fastfile 의 완성된 내용은 다음과 같다.
# This file contains the fastlane.tools configuration
# You can find the documentation at https://docs.fastlane.tools
#
# For a list of all available actions, check out
#
#     https://docs.fastlane.tools/actions
#

# Uncomment the line if you want fastlane to automatically update itself
# update_fastlane

default_platform(:ios)

platform :ios do
  before_all do
    setup_circle_ci
  end

  desc 'Build and run tests'
  lane :test do
    scan
  end

  lane :beta do
    desc 'TesfFlight for IOS'
    # Circle CI does not create new code signing certificates or provisioning profiles.
    sync_code_signing(type: 'appstore', readonly: true, app_identifier: 'com.teammondrian.devopsrn2') # Bundle Identifier를 아까 만든 값으로 치환한다.
    # see code signing guide for more information, readonly because of CircleCI
    build_app(scheme: 'DevOpsForRN')
    upload_to_testflight(skip_waiting_for_build_processing: true)
    # slack(
    #   slack_url: 'https://hooks.slack.com/services/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'
    #   channel: 'dev',
    #   message: 'Successfully uploaded a fastlane beta release'
    # )
  end
end

lane :increase_build_number_and_push_to_beta do |values|
    # Increment the build number (not the version number)
    # Providing the xcodeproj is optional
    increment_build_number(xcodeproj: 'DevOpsForRN.xcodeproj')
    # Commit the version bump
    commit_version_bump(xcodeproj: 'DevOpsForRN.xcodeproj', force: true)
    # Add a git tag for this build. This will automatically
    # use an appropriate git tag name
    add_git_tag
    # Push the new commit and tag back to your git remote
    push_to_git_remote(
        remote_branch: 'beta', # optional, default is set to local_branch
        force: true,    # optional, default: false
    )
end
* DevOpsForRN 폴더 안에 .circleci라는 디렉토리를 만든다.
* DevOpsForRN/.circleci/config.yml 에는 다음의 내용을 추가하자
# .circleci/config.yml

# To Validate your config.yml then use this cli.
# `$ circleci config validate -c .circleci/config.yml`
version: 2
jobs:
  build:
    working_directory: ~/project
    docker:
      - image: circleci/node:8
    steps:
      - checkout
      - run: yarn
      - run: yarn run test
      - persist_to_workspace:
          root: ~/project
          paths:
            - node_modules
      - store_test_results:
          path: ~/project/junit.xml

  beta-deploy-ios:
    working_directory: ~/project/ios
    macos:
      xcode: '9.0'
    steps:
      - checkout:
          path: ~/project
      - attach_workspace:
          at: ~/project
      - run: bundle update fastlane
      - run: bundle exec fastlane beta

  ios:
    macos:
      xcode: '9.0'
    working_directory: ~/project/ios
    environment:
      FL_OUTPUT_DIR: ~/project/output
    shell: /bin/bash --login -o pipefail
    steps:
      - checkout:
          path: ~/project
      - run:
          name: Set Ruby Version
          command:  echo 'ruby-2.4' > ~/.ruby-version
      # Not using a workspace here as Node and Yarn versions
      # differ between the macOS image and the Docker containers above.
      - run: yarn
      - run: bundle install --path vendor/bundle
      - persist_to_workspace:
          root: ~/project
          paths:
            - ios
      - run: bundle exec fastlane test
      - store_artifacts:
          path: ~/project/output
      - store_test_results:
          path: ~/project/output/scan

workflows:
  version: 2
  node-android-ios:
    jobs:
      - build
      - ios:
          requires:
            - build
      - beta-deploy-ios:
          filters:
            branches:
              only:
                - beta
          requires:
            - ios
CircleCI에서 Code Signing, Fastlane Match를 이용하기 위해서는 다소 많은 초기 작업이 필요하다. 다음 문서를 따라 하면 일련의 초기화, key setting 작업을 완료할 수 있다. Setting Up Code Signing for iOS Projects - CircleCI
* Github에 프로젝트 모두 올리기
Github Repository를 새로 하나 생성한다.
# DevOpsForRN/ 디렉토리에서 진행한다.
$ git init
$ git remote add origin https://github.com/philographer/DevOpsForRN.git # 자신의 repo 주소로 변경하기
$ git add --all
$ git commit -m 'first commit'
$ git push -u origin master
* CircleCI의 Project를 생성한다.
* CircleCI - Dashboard 접속
* MacOS 빌드는 유료이므로, 무료 플랜을 선택한다.
* 좌측 Settings -> MacOS Plan -> Trial Plan Click
* 좌측 Project 탭 클릭 -> Add Project 클릭
* 방금 만든 Github Repo의 오른쪽에 Setup Project 버튼을 클릭
* OS는 macOS 선택
* Start Build 버튼 선택
* Work-Flow 탭으로 이동되는데, 자세히 보려면 빌드 이름을 누르면 된다.
다음과 같이 보이면 성공이다.

* CircleCI의 Project Setting -> Environment Variables -> Add Variable 을 클릭하고, 다음의 환경변수들을 추가한다.
MATCH_PASSWORD: 아까 만든 match pass phrase 입력
FASTLANE_USER: Apple ID 입력 (ex. [email protected])
FASTLANE_PASSWORD: Apple PW 입력

* CircleCI의 Project Setting -> Checkout SSH Keys -> Add Deploy Key 버튼 또는 Create and add ... user key 버튼을 클릭한다.
그렇다면 후에 CI에서 debug 해야 할 ssh-key를 자동으로 vm에 미리 넣어준다. 따라서 미리 지정해둔 계정에서는 ci vm에 접근할 수 있다.

Trigger Script 작성
* DevOpsForRN/package.json 파일을 다음과 같이 수정한다
* scripts에 native-test 추가
* scripts에 beta 추가
{
  'name': 'DevOpsForRN',
  'version': '0.0.1',
  'private': true,
  'scripts': {
    'start': 'node node_modules/react-native/local-cli/cli.js start',
    'test': 'jest',
    'native-test': 'tools/run_native_test.sh', # 추가
    'beta': 'tools/run_beta_deploy.sh', # 추가
  },
  'dependencies': {
    'react': '16.2.0',
    'react-native': '0.52.1',
    'react-native-fabric': '^0.5.1'
  },
  'devDependencies': {
    'babel-jest': '22.1.0',
    'babel-preset-react-native': '4.0.0',
    'jest': '22.1.4',
    'react-test-renderer': '16.2.0'
  },
  'jest': {
    'preset': 'react-native'
  }
}
* Shell Script 작성하기
* DevOpsForRN/tools 디렉토리를 생성한다
* DevOpsForRN/tools/run_beta_deploy.sh 파일을 생성하고, 다음의 내용을 작성한다.
#!/usr/bin/env bash

cd ios
fastlane increase_build_number_and_push_to_beta
* DevOpsForRN/tools/run_native_test.sh 파일을 생성하고, 다음의 내용을 작성한다.
#!/usr/bin/env bash

cd ios
fastlane test
* 작성한 후, 권한을 부여한다
$ chmod +x run_beta_deploy.sh
$ chmod +x run_beta_deploy.sh
Xcode Signing 설정
* fastlane에서 사용할 인증서를 선택한다.

TestFlight 보내기
다음의 스크립트를 실행했을 때, Circle CI에서 work-flow가 올바르게 실행되나 지켜본다.
# DevOps/ 디렉토리에서
$ npm run beta
* CircleCI Dashboard 접속
* 다음과 같이 JS Test -> IOS Native Test -> TestFlight Deploy가 성공했는지 확인

TestFlight에 사용자 초대
* iTunes Connect 에 접속
* 나의 앱 -> 자신이 이전에 만들었던 앱 클릭
* TestFlight 탭 클릭
* 테스터 및 그룹 -> Itunes Connect 사용자 클릭
* 버튼 누르고, 사용자 초대
* 초대한 사용자의 이메일에서 초대 수락

암호화
* 앱 내 추가 기능
* 암호화 탭의 지침에 따른다.

Reference
match is-this-secure? - fastlane docs
fastlane for React Native iOS & Android app DevOps – React Native Training – Medium
 가입하기
가입하기