GitHub 계정으로 Kubernetes 인증하기
 데일리호텔
/ 조회수 : 3104
데일리호텔
/ 조회수 : 3104
데일리호텔
/ 조회수 : 3104
초기에는 kube-aws가 만들어준 관리자 인증서를 통해 Kubernetes를 관리했는데 역시나 대내외적으로 여건이 바뀌니 변화가 필요했다. 내부적으로는 개발 인력이 늘고 여러 프로젝트가 동시 진행되니 Staging 환경이 급격히 바뀌는데 계정이 하나이니 누가 무슨 작업을 했는지 확인하기 어렵고 외부적으로는 경쟁사의 보안사고 등에 영향을 받아 보안을 강화할 필요가 생겼다. 하여 보안 관련 작업을 여럿했고 그 중 하나가 바로 GitHub와 Kubernetes를 OAuth로 엮는 일이다.
기본적으로는 개발자 각자가 자신의 GitHub 계정으로 인증 토큰을 받고 이를 이용해 Kubernetes API에 접근하는 것이다. 전체적인 흐름은 How I built a Kubernetes cluster so my coworkers could deploy apps faster 등을 참고하면 이해하기 그리 어렵지 않다.
1. Admin time should be saved (since they are also our developers)
2. New users can generate their own credentials without needing the admin
3. User credential is always private for security reasons다만 저들과 달리 Webhook 토큰 인증 플러그인을 직접 짜지 않고 coreos/dex를 이용했다. Dex를 이용하면 GitHub를 비롯해 다양한 OpenID, OAuth 2.0 인증 서비스와 Kubernetes 클러스터를 엮기 쉽다. 더욱이 kube-aws에 Dex가 통합되어서 설치하기도 쉽다.
구구절절 어떻게 설정하는지 설명할 생각은 없는데 회사와 프로젝트에 따라 세부적인 차이가 꽤나 클 수 있기 때문이다. 그러니 대략적인 작업 순서를 간략히 기술하고 끝내려 한다.
우선 kube-aws의 cluster.yaml를 보자.
# # Enable dex integration - https://github.com/coreos/dex
# # Configure OpenID Connect token authenticator plugin in Kubernetes API server.
# # Notice: always use "https" for the "url", otherwise the Kubernetes API server will not start correctly.
# # Please set selfSignedCa to false if you plan to expose dex service using a LoadBalancer or Ingress with certificates signed by a trusted CA.
# dex:
# enabled: true
# url: "https://dex.example.com"
# clientId: "example-app"
# username: "email"
# groups: "groups"
# selfSignedCa: true
#
# # Dex connectors configuration. You can add configuration for the desired connectors suported by dex or
# # skip this part if you don't plan to use any of them. Here is an example of GitHub connector.
# connectors:
# - type: github
# id: github
# name: GitHub
# config:
# clientId: "your_client_id"
# clientSecret: "your_client_secret"
# redirectURI: https://dex.example.com/callback
# org: your_organization
# # Configure static clients and users
# staticClients:
# - id: 'example-app'
# redirectURIs: 'https://127.0.0.1:5555/callback'
# name: 'Example App'
# secret: 'ZXhhbXBsZS1hcHAtc2VjcmV0'
#
# staticPasswords:
# - email: "[email protected]"
# # bcrypt hash of the string "password". You can use bcrypt-tool from CoreOS to generate the passwords.
# hash: "$2a$10$2b2cU8CPhOTaGrs1HRQuAueS7JTT5ZHsHSzYiFPm1leZck7Mc8T4W"
# username: "admin"
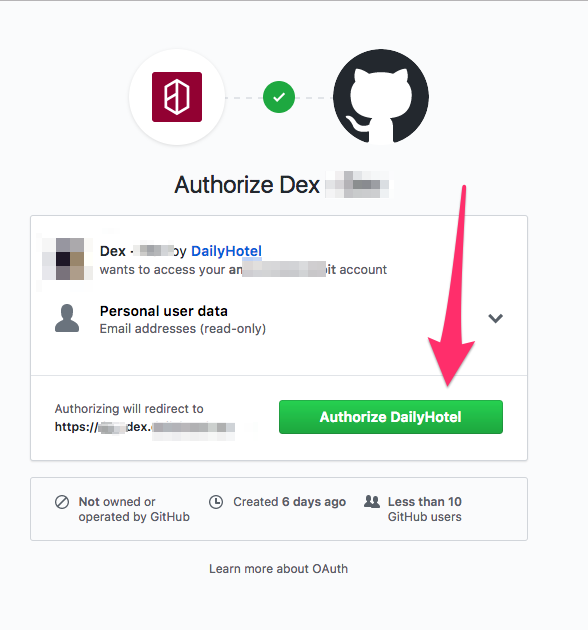
# userID: "08a8684b-db88-4b73-90a9-3cd1661f5466"우선 GitHub의 Organization Settings 메뉴로 가서 OAuth Apps에 Dex를 추가한다. 이때 Authorization calllback URL은 https://dex.example.com/callback가 된다.
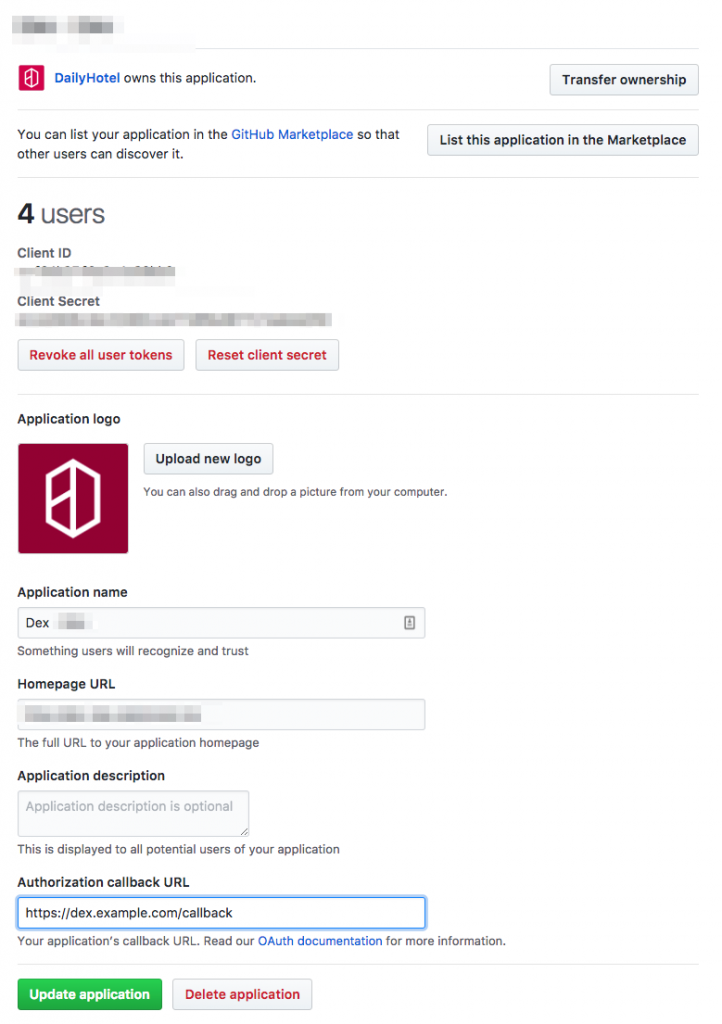
GitHub가 준 Client ID와 Client Secret를 cluster.yaml에 적어넣는다.
dex:
enabled: true
url: "https://dex.example.com"
clientId: "example-app"
username: "email"
groups: "groups"
selfSignedCa: false
#
#   # Dex connectors configuration. You can add configuration for the desired connectors suported by dex or
#   # skip this part if you don't plan to use any of them. Here is an example of GitHub connector.
connectors:
- type: github
id: github
name: GitHub
config:
clientId: "GITHUB_OAUTH_APP_CLIENT_ID"
clientSecret: "GITHUB_OAUTH_APP_CLIENT_SECRET"
redirectURI: https://dex.example.com/callback
org: DailyHotel
#   # Configure static clients and users
staticClients:
- id: 'example-app'
redirectURIs: 'https://kid.example.com/callback'
name: 'Example App'
secret: 'ZXhhbXBsZS1hcHAtc2VjcmV0'
staticPasswords:
- email: "[email protected]"
#       # bcrypt hash of the string "password". You can use bcrypt-tool from CoreOS to generate the passwords.
hash: "$2a$10$2b2cU8CPhOTaGrs1HRQuAueS7JTT5ZHsHSzYiFPm1leZck7Mc8T4W"
username: "admin"
userID: "08a8684b-db88-4b73-90a9-3cd1661f5466"
여기서 dex.example.com은 kube-aws가 띄울 dex Deployment와 연결되는 서비스(ELB)의 도메인주소가 되어야 한다. 그런데 kube-aws는 Dex의 External service를 생성해주지 않으므로 아래와 같이 직접 서비스를 생성해야 한다. GitHub가 이쪽으로 콜백을 보내야 하므로 방화벽을 열어야 하고 회사 도메인 인증서를 붙일 것이므로 `selfSignedCa`값은 `false`로 한다.
apiVersion: v1
kind: Service
metadata:
name: dex
namespace: kube-system
labels:
app: dex
component: identity
dns: route53
annotations:
domainName: dex.example.com
service.beta.kubernetes.io/aws-load-balancer-ssl-cert: arn:aws:acm:blahblah
service.beta.kubernetes.io/aws-load-balancer-backend-protocol: http
service.beta.kubernetes.io/aws-load-balancer-ssl-ports: https
spec:
ports:
# the ports that this service should serve on
- name: https
port: 443
targetPort: 5556
protocol: TCP
selector:
app: dex
component: identity
type: LoadBalancer
loadBalancerSourceRanges:
- 0.0.0.0/0
staticClients / example-app는 Dex에 포함된 예제 프로그램이다. 이를 이용하면 웹 브라우저를 통해 GitHub에 인증하고 토큰을 내려받을 수 있다. DailyHotel/kid 등의 도커 이미지를 사용하면 쉽게 띄울 수 있다. kube-aws는 이 예제 프로그램을 띄우지 않기 때문에 직접 올려야 한다.
apiVersion: v1
kind: Service
metadata:
name: kid
namespace: kube-system
labels:
app: kid
dns: route53
annotations:
domainName: "kid.example.com"
service.beta.kubernetes.io/aws-load-balancer-ssl-cert: arn:aws:acm:blahblah
service.beta.kubernetes.io/aws-load-balancer-backend-protocol: http
service.beta.kubernetes.io/aws-load-balancer-ssl-ports: https
spec:
ports:
- name: https
port: 443
targetPort: 5555
protocol: TCP
selector:
app: kid
type: LoadBalancer
loadBalancerSourceRanges:
- 사무실IP/32
---
apiVersion: extensions/v1beta1
kind: Deployment
metadata:
name: kid
namespace: kube-system
spec:
replicas: 1
template:
metadata:
labels:
app: kid
spec:
containers:
- name: kid
image: dailyhotel/kid:latest
livenessProbe:
tcpSocket:
port: 5555
timeoutSeconds: 120
ports:
- containerPort: 5555
env:
- name: CLIENT_ID
value: example-app
- name: CLIENT_SECRET
value: ZXhhbXBsZS1hcHAtc2VjcmV0
- name: ISSUER
value: https://dex.example.com
- name: LISTEN
value: http://0.0.0.0:5555
- name: REDIRECT_URI
value: https://kid.example.com/callback
이때 example-app의 REDIRECT_URI는 Dex의 REDIRECT_URI와는 다르다는 점에 주목하자. 옵션의 이름이 비슷하기 때문에 헷갈릴 수 있다. 또한 CLIENT_ID와 CLIENT_SECRET은 cluster.yaml 중 GitHub connector 설정이 아닌 staticClients 설정에서 쓴 값이라는 점도 눈여겨볼 필요가 있다.
이 정도만 주의하면 dex를 설치하고 설정하는 것은 어렵지 않다. 이제 인증하는 방법을 알아보자.
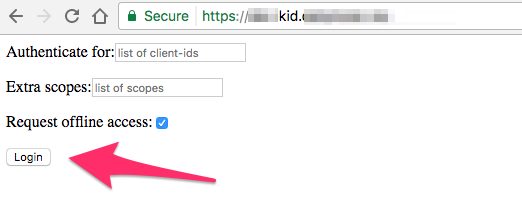
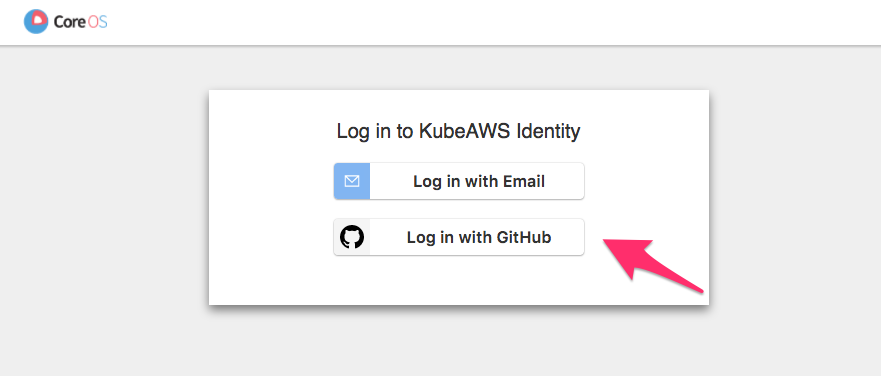
웹브라우저로 kid에 방문해서 토큰을 받는다. 첫 화면에서 Login 버튼을 누른 후 GitHub 로그인을 하면 토큰이 나온다.


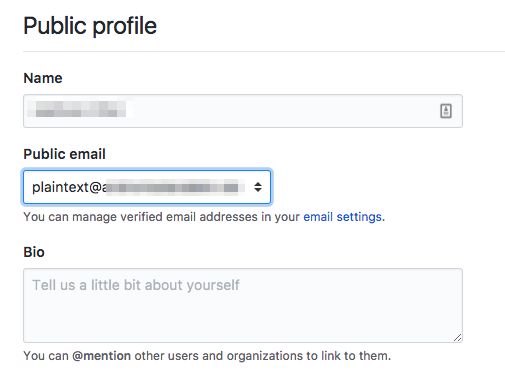
GitHub Public profile 메뉴로 가서 Public email 설정을 확인한다. 공개 이메일이 없다면 하나 추가한다. 로그인시 사용자 아이디로 쓰기 위함이다.
kubeconfig 파일을 열고 kubeconfig 파일을 열고 MY_PUBLIC_GITHUB_EMAIL에는 GitHub 공개 이메일 주소를 적고 VISIT_KID_EXAMPLE_COM_AND_GET_TOKEN에는 앞서 받은 토큰을 적는다.
apiVersion: v1
kind: Config
clusters:
- cluster:
certificate-authority: credentials/ca.pem
server: https://MY_KUBE_CLUSTER
name: kube-aws-cluster
contexts:
- context:
cluster: kube-aws-cluster
namespace: default
user: MY_PUBLIC_GITHUB_EMAIL
name: kube-aws-context
users:
- name: MY_PUBLIC_GITHUB_EMAIL
user:
token: VISIT_KID_EXAMPLE_COM_AND_GET_TOKEN
current-context: kube-aws-context
인증 파일의 설정이 정확한지 확인하려면 kubectl --kubeconfig=./kubeconfig version을 실행해보자. 아래와 같이 Client/Server의 버전이 둘다 나오면 정상이다.
$ kubectl --kubeconfig=./kubeconfig version

Client Version: version.Info{Major:"1", Minor:"6", GitVersion:"v1.6.1", GitCommit:"b0b7a323cc5a4a2019b2e9520c21c7830b7f708e", GitTreeState:"clean", BuildDate:"2017-04-03T20:44:38Z", GoVersion:"go1.7.5", Compiler:"gc", Platform:"darwin/amd64"}
Server Version: version.Info{Major:"1", Minor:"6", GitVersion:"v1.6.2+coreos.0", GitCommit:"79fee581ce4a35b7791fdd92e0fc97e02ef1d5c0", GitTreeState:"clean", BuildDate:"2017-04-19T23:13:34Z", GoVersion:"go1.7.5", Compiler:"gc", Platform:"linux/amd64"}관련 스택


 가입하기
가입하기